Hi, everyone! I’m back with the Hermès scarf tying article Part Two (here’s Part One), “Electric Boogaloo”, where I will attempt to explain to you how to tie your Hermès scarves in the other formats, specifically the shawl size, the pochette, the twilly and the maxi twilly slim.
If you haven’t read part one yet (or need a refresher), you can read part one now.
This is especially important as you will want to know how to fold your scarf in the oblong/bias fold.
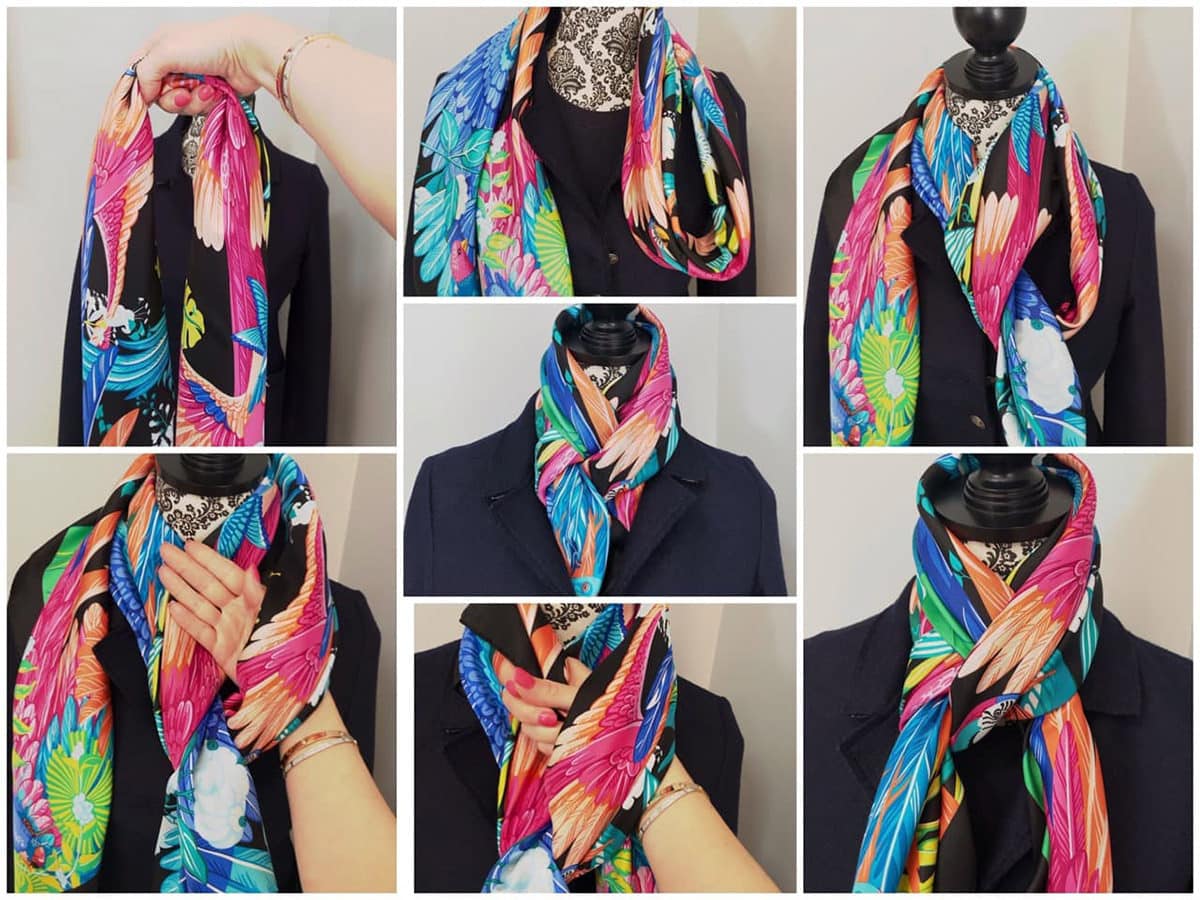
The 140cm Shawl
It seems to me that most people either prefer the regular, 90cm square (“carrè” or PM/petit modele) size, OR the larger, 140cm (shawl or GM/grand modele) size. I personally find that both sizes have their uses, although generally the larger sizes can be a bit more functional (for warmth) and not just decorative. This is true regardless of whether you are using a 140cm scarf of silk, mousseline, or the cashmere/silk blend; to me, they’re all pretty warm, and as for me, my purchases are based more on the design rather than the blend. While the cashmeres are very soft and cozy, I find that colors are truer and bolder on the silk, and the silk is also less bulky. I personally love the mousselines, but as you can see all the layers at once, it’s difficult to show how one is tied. For these reasons, I have decided to use a 140cm silk to demonstrate the tying options for this size, as it will be easier for you to see. Most of these options can be done with any of these larger formats, whether cashmere blend, silk or mousseline.
Many of the basic ties that I demonstrated with a 90cm you can also do with a 140cm, it will just be a bit thicker and longer. You can’t necessarily just bias fold a GM cashmere and tuck it into a blazer because it will be longer than the hem of a blazer; however, you can absolutely do that with a longer coat.

You can also take up the length a bit by wrapping the shawl around your neck once first.

You do have other options after wrapping it around your neck. You can do a half tie which will make the shawl shorter and will also jumble up the design nicely. Further, if you want to keep the shawl mostly around your neck, you can then place the ends that are hanging in front of you behind your neck and tie them together.

Another good option is to fold the shawl into a triangle (top left) and put the triangle in front of you (middle), with the ends hanging down behind you. Pull the ends around the back of your neck and to the front of you (top right), and half-knot the ends together (bottom left). You can tuck this into a jacket, blazer or coat.

Similar to one of the options I mentioned in part one, bias fold the shawl and wrap the ends around each other once (top middle and right). Then bring the ends around behind your neck (bottom left). You can tie them and be done, or you can pull them in front of you (bottom middle). You can also then tie them in front of you (bottom right).

Of course, there is this very simple method which always works if you have no time to play. Bias fold, and bring the middle to one side of you, and the ends on the other side (left). Bring the ends through the middle (right).

This fold I also demonstrated in the last article but honestly I love how it looks on this shawl, so here it is again. Bias fold the shawl, and bring the middle to the one side, creating a loop, and the ends on the other side (top middle). Whereas right above you bring both ends though the loop, here just bring one end through the loop (top right). Bring your hand under the far side of the loop and through (bottom left), and grab the other end, pulling it through (bottom middle). Adjust (bottom right). Done (center)!

Here is an “unofficial” tying method I made up about 15 years ago, the first time I tried on a GM cashmere shawl. I wanted to see if there was a way I could keep it on my shoulders, so that it looked draped without it being in danger of falling off. Fold the shawl into a triangle and drape it over your shoulders with the point hanging down your back and the ends in the front (top left). Wrap the ends around each other; this will sit somewhere at or a few inches below your heart (top middle and right). Bring the ends around back (bottom left) and tie them together behind your back, under the triangle (bottom middle). Adjust.

While I find scarf rings can be useful in achieving fun tying methods for shawls, my personal opinion is that they work best when utilized for practical purposes, like taking up length or making the amount of the material you are wearing more manageable. I really only have one shawl ring and I don’t use it very often; if I’m using a shawl for going outside, then I’m probably going to take it off as soon as I’m indoors and my coat is off. If I’m using it for being indoors (for a dinner or event, or some place air conditioned) then I have a tendency to realize that I’m getting overheated at the very last moment, and in those five seconds of sweaty desperation I do not want to be caught clawing off a delicate mousseline or snag-gable cashmere. But you may want a few options, so here they are:
Bias fold, and put an end through one opening (bottom left). You can be done, or you can bring the ends behind you and tie them together (bottom right).

Bias fold the scarf and drape it around your neck with both ends hanging down. Bring both ends through both openings (this won’t work with a cashmere unless you have a very large shawl ring). You can be done here (top left), or you can make a loop with the material you brought through the ring (top middle) and bring one end through it (top right), or both ends through it, with the ends going in opposite directions (bottom left). You can tighten the loop and be done, or you can pull the ends mostly through or all the way through (bottom middle) and then tighten the loop (bottom right).

Bias fold the scarf and pull one end though both openings, moving the ring to the middle of the folded shawl. Wrap the shawl around your neck all the way once, with both ends hanging down in front of you and the ring at the center of your neck (top left). You can be done here, or tie the ends together. If you’d like to continue – as above, pull the material that’s going though the ring out a bit, making a loop (top right). Pull both ends through that loop (bottom left and middle). Tighten the loop and adjust (bottom right).

The Pochette
At about 45cm square, the pochette is small. Having less material makes this scarf more of an accent piece for a pop of color. You can absolutely do a bias fold and just tie it around your neck like that –

- or fold it in half diagonally and tie it around your neck.

If you want to get a bit more creative, you can use a twilly ring. Hermès used to sell these, but you can find similar versions on etsy.
In this case, the ring is more decorative than helpful. Here, you can do a bias fold and slide the twilly ring to the middle. Then you can just tie it around your neck, or even your head, like a headband.
You can also slide each end through an opening and wear it around your neck like that.

Another method is to bias fold the pochette, then slide the ring onto one end of it (top right). Pull out the material that is being held against the ring, creating a loop (bottom left). Pull the other end through the loop and tighten the loop (bottom right).

Again, you can use a regular-sized scarf ring decoratively with a pochette – just slide it to the middle and tie behind your neck.

If the ring isn’t too big, you can try threading each end through it in opposite directions (middle) and pull (right).

Twilly
Finally, the twilly. If you have been reading my articles for a while you might remember that the twilly was originally introduced by Hermès in 2002 as a scarf to be worn; customers came up with the idea of using them to tie around bag handles.

There are a few other simple ways to wear a twilly, whether just tied around your neck, or using other methods with a small scarf ring.

Here is something else I came up with which is a bit more unusual and fun.
Take a twilly and thread it through a ring on one side. You may have to play with it to get the proportions right, but it’s between the end and the middle (top left). Then thread the other end through the openings again, going in the same direction (top middle and right), so that you have two loops coming out of the top of the ring (middle left). Turn the ring to the side and play with the loops so that you now have a top loop and a bottom loop (middle right). There will be a longer end and a shorter end. Put the scarf ring against the side of your neck vertically with the short end hanging down in front of you, and wrap the long end around your neck so that the end comes around and sits next to the scarf ring (bottom left). Tuck that longer end into the top opening of the scarf ring behind the loop, and pull down and out so that both ends are now hanging down in front of you (bottom middle). Adjust (center).

How To Tie An Hermès Face Mask
I have received a number of requests for a scarf face mask, which I am reluctant to do. First, the mask would be purely decorative – silk is not well-regarded for any ability to protect against airborne microorganisms or particulate matter. Second, you would have to wash it frequently, which would create a lot of unnecessary wear and tear. Third, silk doesn’t really stay tight very well; I tried the folding technique that has been going around social media (done with cotton) and most of the time I end up with a floppy mess. Finally, the silk really is not that breathable, so if in fact you manage to tie it tight enough to protect you, it will be too tight to get much air (I keep trying, and every time I can feel the silk getting inhaled toward my nostrils, which I do not recommend).
However, I have come across a good option if you want to incorporate that Hermès scarf look with a viable mask option. Please check out Instgrammer @manastashmercantile – they have figured out a way to create masks from the Olson Mask pattern, and include a space to insert a filter (you can also order a coordinating scrunchie, which I personally am going to need because my hair is getting a little crazy at this point…) From what I understand, they use the proceeds from the mask sales “to fund masks for healthcare professionals”. I am not affiliated with this person, and I haven’t received mine yet, but it does seem like a better choice than what I have attempted to come up with.
More Options
If you have enjoyed these suggestions and would like some more tying possibilities, there are other great resources online. I’m just starting you off with some basics that I use. One great place to go is to my friend MaiTai’s website, as she is truly a connoisseur of scarf tying. She also offers some great coordinating scarf rings and Hermès accessories, and writes a really lovely blog.


Another fun article! This is so helpful and gives me more options for my twilly’s and 90cm scarf. Also, I had no idea that “customers came up with the idea of using “twilly’s” to tie around bag handles”. My Hermes SA pushes them by informing me that “Hermes highly recommends twilly’s to protect the handles since they won’t replace them”. Anyway, very enjoyable read!
Thank you! I’m so glad you enjoyed it.
I love this twilly pattern but can’t find on their website?
It’s an older twilly, from a few years ago. The design is Under The Waves by Alice Shirley.
This was such a fantastic article! I love the photos and the step by step descriptions. I am going to save this for future reference and – I’m going to try my hand at one of these styles tomorrow. Thank you!
My pleasure! 🙂
You’re missing one – The Covid-knot. Where you tie it around your mouth like a mask. I am actually surprised I havent seen this on instagram yet. Great article though!
Thank you! Yes, I mentioned at the end that I wouldn’t be doing a tie to replicate a face mask. You could just try it bandit-style, although the 90cm isn’t the ideal size or material for a face mask. I bought one online that was made from an Hermes scarf but backed with a different material.
I’d love some tips on how to wear a silk jersey scarf! I’ve seen ideas on the forum and other places online but no matter what I try it just sits like a bib on me!
I love the scarf in the top photo, what is the name of the design?