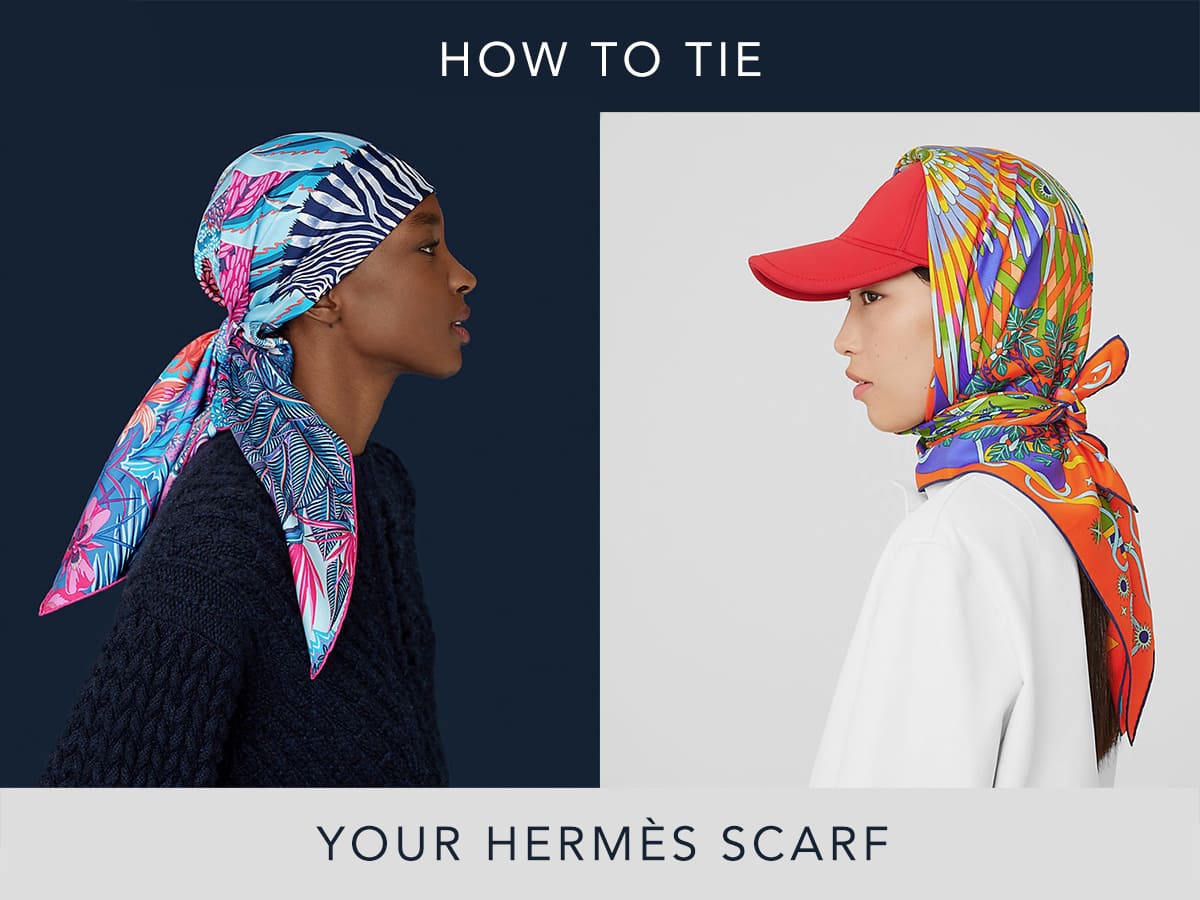
Now that we are all staying at home and “shopping our wardrobes”, we have a little extra time to do and learn things that we might not normally have time for. I have had a number of requests to write an article about scarf tying, so now is as good a time as any to give a few pointers on this subject.
I have been told many times by friends and acquaintances that “only you [meaning me] can wear a scarf” or “I look like a stewardess” or “I have no idea what to do with it”. I think, like with anything, if this is something you are interested in trying, it is DEFINITELY something that you can do, and YOU can totally rock it!
I will start here with the most commonly-produced Hermès scarf size, which is 90cm x 90cm (35” square). Most of these ties can be adapted to smaller or larger sizes, but in my next article I will discuss tying options for some of Hermès other scarf formats. You might think that a quick trip to the Hermès website would yield some good tying suggestions, but unfortunately that is not the case. Inexplicably, Hermès website scarf photographs are not all that helpful. First, the way that they photograph their scarves results in some minor but noticeable differences with regards to the actual colors of the scarf, and they frequently favor impractical methods of tying.
For example:

This is one of the website’s most-utilized ways to show how a scarf looks when worn. It looks beautiful, and I do not know anyone who wears a scarf like this. If you have hair of any length, the scarf will fall off.

This is fabulous if you like the feeling of auto-asphyxiation AND the look of a hat.

I am trying to think of a situation where this would even be a good idea. DM me if you think of one.
The first thing to learn is how to fold a scarf so that you can tie it. There are two main ways to fold a scarf. The first way is just to fold it in half across the middle of the scarf diagonally, so that you are folding it into two triangles. This is the way many people fold a scarf, and while it’s fine, it’s something I almost never do, as there aren’t very many ways one can wear it while folded like that; most of the time you pretty much tie it around your neck with the point hanging down, like a cowboy or (yikes) a bib, tie it, and done. That’s great for showing a lot of the design or covering your neck, but there are many great other ways to tie it that aren’t so overpowering.
The Oblong/Bias Fold
Here is the basic bias fold. I have chosen this colorway of Alice Shirley’s “Mountain Zebra” from Autumn/Winter 2019 because it’s a busy design with a variety of bold colors.

Place the scarf with the main printed side facing down.

Take one corner (I usually start with the corner that has the tag) and fold it across the middle.

Take the diagonally opposite corner and also fold it across, overlapping the other end that you just folded in.

Go back to the first side and fold the long folded edge inward to the middle again.

Return to the other side and do the same.

Depending on how wide you want the scarf to be, you may be done now, or you can keep folding the opposite sides in until you have folded the scarf into an oblong shape that basically shows the entire middle of the scarf design and is the length of the diagonal.


Try practicing this a few times. One of the fun/tricky aspects of this is determining which part of the scarf you want to show, and once you play with folding it like this a bit, you can see how it’s possible to manipulate (to some extent) which part of the design the oblong diagonal shows.
Here I am illustrating how I manipulated folding this scarf. I did not fold each side evenly. I took a good look at the scarf and decided which area I wanted to highlight; in this case, I wanted to hide the Zebra and highlight some pink:

So this time I am not folding towards the exact middle. I start with folding a lot more of that top corner back –

and a lot less of the bottom corner –

I continue folding inward, favoring the bottom of the scarf and hiding the Zebra as much as I can:


Folding the top part in again

and again

Rolling the Zebra part inside

And highlighting my favorite part

If I curl it around once, I can see which area will show up front

Once you can fold this oblong strip there are many fun options for tying.
Tying Without A Scarf Ring
The easiest method, for under a suit jacket or tucked inside a collar, is simply doing nothing; wrapping the scarf once behind your neck and letting the ends hang down the front. You will just see the edge of the scarf design along the collar/jacket line.

So that’s a very simple and easy-to-wear option – and after all these years, that’s really the way I wear mine the most often.
Another great option – especially under a jacket or tucked in a collar, Is this simple method:

- Cross end over end.
- Bring one end under and through – like you are tying a bow or a knot.
- Make it neat.
-
Bring the end that’s lying on top over the bottom end – just move one over the other.
-
Adjust and tuck in.
You can also simply wrap the ends around each other once and then bring them behind your neck and tie them together.

Another option I use quite often is to simply loop the scarf once around my neck and tuck it in. This is like the first way, just wrapping it around your neck once as well.

In the last three photos, I illustrate something else you can do –
- If you don’t want the ends just hanging down, you can tie them once in the front. You can leave it like that, or:
Bottom right photo – tuck the ends in.
One of the first tying methods I learned is easy and versatile.

- Tie a knot in the middle of the scarf.
Bring the ends behind your neck and around to the front.
Tuck one end through the knot.
Tuck the other end through the knot and adjust as needed.
You can always turn this to the side or even to the back of your neck.
Ok, here’s a slightly tricky one, but I love it for when I want to completely mix up a design. This method also works wonderfully with large formats when you want to keep your neck warm.

- Fold your scarf oblong and drape around your neck so that the middle loop is on one side and the ends are on the other.
Ok. Here’s the slightly confusing part (and I really mean me here, as when I learned this I found it hard to understand…)

- You have one end through the loop. You are essentially going to create another loop by pulling the remaining end behind the bottom part of the original loop. I put hand and my arm through this new loop here so that you can see where it goes.
Scarf Rings: The Regate (Circular) Ring
Scarf rings give you many other options for tying and, once you’ve been using them for a while, it’s easy to get creative with them. The first ring I am using here is a Regate, but you can use any circular ring. The only thing to remember, however, is that scarf rings are made specifically for scarves, so you don’t have to worry quite so much about the ring fitting or even accidentally snagging your scarf (the ring MUST be perfectly smooth to avoid damage. With that said – and I am not making this up – my mother sometimes uses the Minnie Mouse ring she bought for me at Disney World when I was five. So, there’s that.

Easy method: slide both ends through, adjust. Done.
Or you can bring the ends behind your neck and tie them together.
Here’s another option: slide both ends through asymmetrically, with a long end and a short end.

Bring the long end all the way around behind your neck. Pull that end to the front and through the scarf ring. Adjust as needed.
Here’s a fun one. It’s not as hard as it might look!

- Pull the scarf through the ring so that the ring sits in the middle of the scarf.
Wrap those ends around the back your neck and bring them to the front.
Pull each end through the scarf ring (it might be a little tight, but it will fit).
You can be done OR you can pull those ends around to the back of your neck again and tie them together.
Don’t forget – no matter which way you tie your scarf, you can always change the look by simply turning the “center” to the side, or by completely turning it around.

Scarf Rings: The Chaine d’Ancre Ring
Personally I find that the circular scarf ring is the most useful and versatile, but there are other shapes you may come across, like this Chaine d’Ancre shape, so I want touch on some options for using this as well.

As with any scarf ring, you can always just pull the ends through and adjust.
If you want, you can bring the ends behind your neck and tie them together.
A fun thing to do with this one is slide one end though both holes and create a loop with them.

Then you can pull the other end through the loop you just created.
Scarf Rings: The Trio Ring
I originally found the trio scarf ring – which has three rings in one piece – to be intimidating, but it doesn’t need to be.

It’s easy enough to either bring the two ends in through two separate rings and out the third ring, or bring the two ends through the same ring and out the two other rings.
One last option for now is something I came up with when I first purchased the trio. There are many variations you can do with this once you play with it. It looks a bit fancy, like a half bow.

- First bring end one through two of the rings, hanging down.
Continue to bring end two up and through the remaining ring – the ring you first pulled end one through – so that end one is going down through that ring and end two is going up through it.
You now have a loop from the end two side.
Adjust as needed.
If you want to turn this into a full bow, you could play with the length and tuck the tip of end two back into one of the rings.
I hope you found this helpful! My next article will expand on these methods for some of the other formats. If you have any questions, feel free to ask on the PurseForum thread I will create after this is published (link in the comments) or you can find me on Instagram. Happy tying!


Great article! Anyone else never been tempted by Hermes scarf designs? I get that they’re hand-painted and excellent quality, probably, but I’ve yet to see a design that hits the spot for me.
If you like the idea of wearing silk scarves, do go into a boutique and try some on. While you may not be over the moon about the picture on the scarf itself, if you try on one that has colors you like, you may love it when folded, tied, and softly hanging around your neck, even if the picture isn’t really your cup of tea.
These are great…love all your Hermès posts….keep going though….lots of ways to wear scarves…thanks and stay safe?
Thank you so much! The next article will focus on other scarf formats, and then I will probably link to other resources too.
I tried to wear my Hermes scarf and Regate scarf ring, but the look was disastrous, at best. This gives me hope that I might be able to successfully wear them soon!
I hope so! Good luck and just have fun!
I like scarves tied loose, not so “done”. Still, excellent article.
Well I guess the first one is loose! I think once you get the hang of it, you can pretty much figure how how to throw one on. Thank you!
When I read that the CDC was recommending everyone wear cloth masks, I immediately thought about using one of my H scarves, as I saw some no-sew mask instructions online converting hankies into masks using hair ties. I would love to know if anyone has tried experimenting with their scarves. I need to try it out too.
Don’t sew!!!
I’ve tried it with a pochette, the other scarves are too big. It’s ok. However, I did find a chart of various materials you can use and silk is not very protective from particulate matter. Cotton is better. And I agree, it’s probably better to use a sturdier material (although now youve got me thinking…)
I wouldn’t use an Hermes scarf as a protective mask. I would use a scarf that I can immediately wash after getting home. Hermes scarves have to go to the cleaners, which means the dry cleaner would have to come in contact with potentially contaminated fabric. Just use an inexpensive scarf you can wash right away at home..
Good point!
Here is the PurseForum discussion thread for this article:
https://forum.purseblog.com/threads/purseblog-article-how-to-tie-a-scarf.1026523/
Thank you so much, so helpful! I’m excited to wear my scarf. And you are right the Hermes website isn’t exactly abundant with practical styling photos…
Great!!!!
Nice job! I used one of my McQueen skull scarves as a face mask today …
Don’t laugh. I have gotten more use of my smaller format Hermes scarves the past 6 weeks than I have in 50 years!
What size scarf do you recommend if I want to tie it to my purse? I’m finding most of my scarves seem too big so they hang down too long.
Actually, I wear a headscarf quite often, tied as pictured!
i have a dilemma w this scarves, no matter how i try hard to try to use them, they just end up being in the closet. They’re so hard to match to outfits because i don’t like prints on prints. For me it only works if you are wearing a monochromatic outfit. Also, I find that bandana prints, monogram prints and zebra prints typically work for me.
Also i am having double vision because the mannequin’s neck is printed lol, it’s hard to envision the actual scarf.